
DIY Fluted Accent Wall: Step-by-Step Guide for a Luxury Look on a Budget
689 views
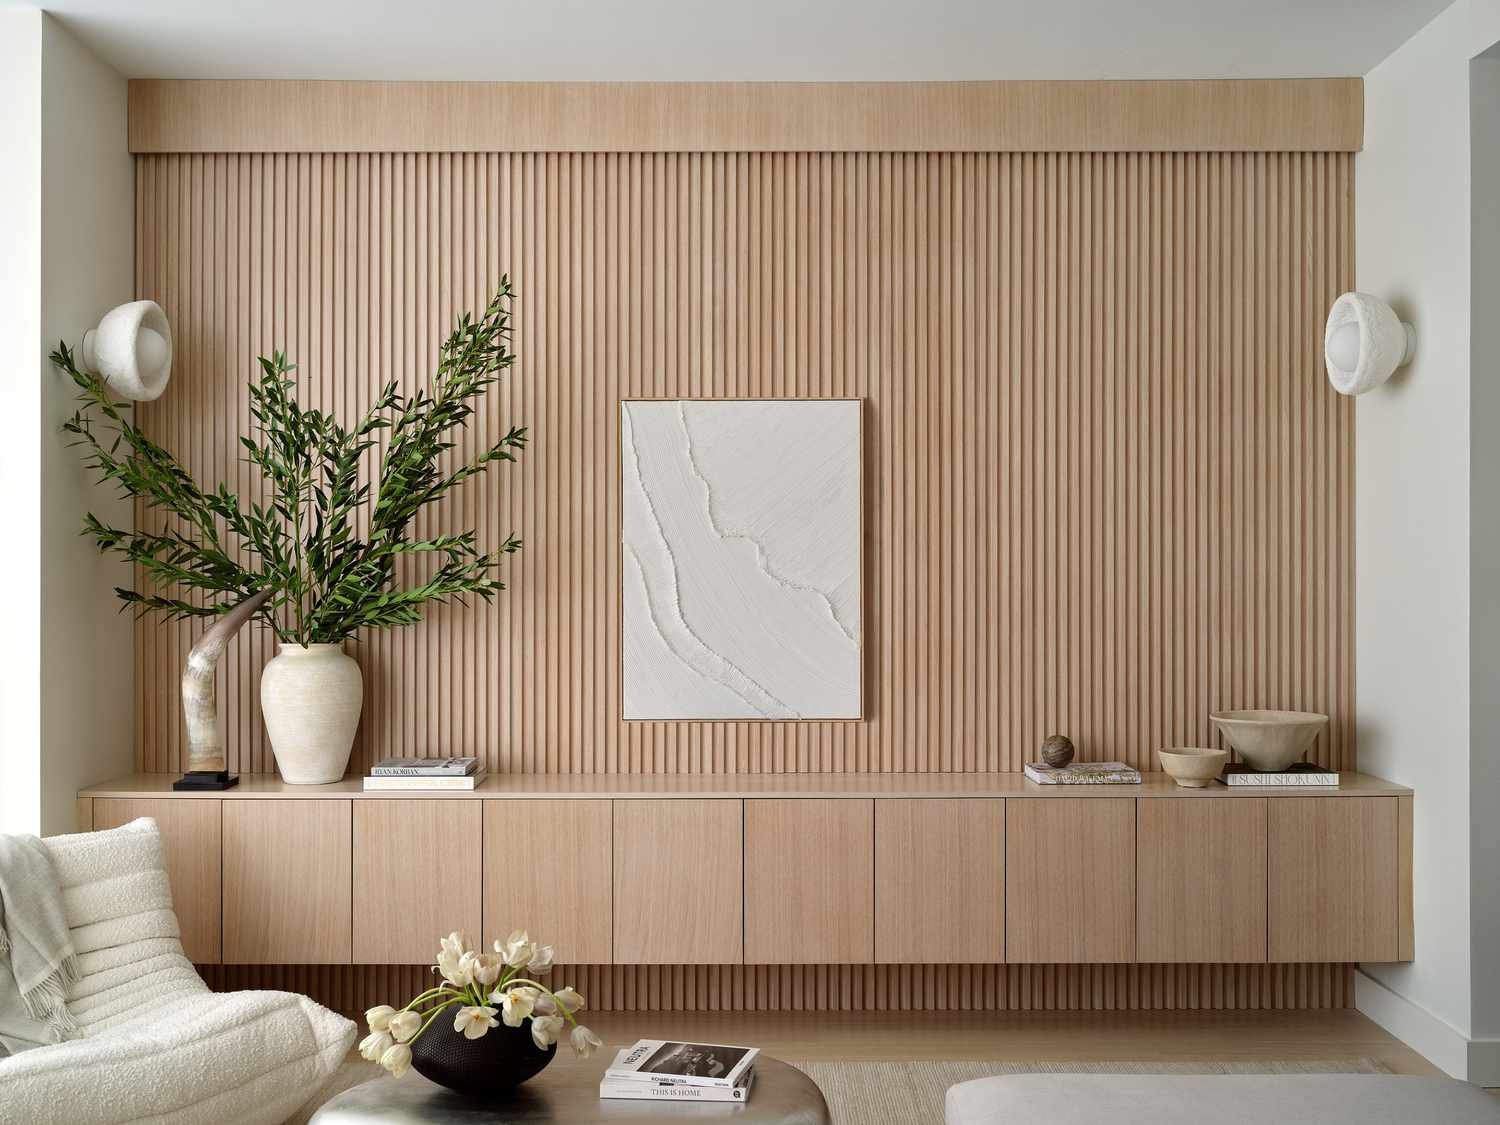
A fluted wall can look expensive enough to belong in a boutique hotel. The annoying part? A lot of the ready-made panels are priced like they do.
There’s another way.
With straight MDF, a saw, a spacer and some patience, you can build the same basic visual language for considerably less. The trick isn't simply sticking strips to a wall. The expensive-looking result comes from the details: consistent spacing, clean edges, a dead-straight first strip, concealed seams and the right paint sheen.
That makes this a particularly good fit for Room Trends' practical DIY approach, where the goal is to make design ideas achievable without turning the project into a full renovation.
First, decide what kind of fluted wall you're actually building
“Fluted” gets used for several different designs.
Some walls use a single manufactured panel with grooves machined into it. Others are made from individual vertical strips attached over a painted wall. For a budget project, the second approach is usually more flexible because you can control the strip width, gap and overall coverage.
For a convincing contemporary look, a useful starting point is:
Element | Practical starting point |
|---|---|
MDF strip | 1½ in. wide |
Visible gap | ½ in. |
Strip thickness | About ⅝–¾ in. |
Orientation | Vertical |
Finish | Matte or low-sheen |
Coverage | One feature wall |
You don't have to copy those measurements exactly. A narrower strip with a tighter gap feels more detailed; wider strips with larger gaps look bolder and more architectural.
Don't choose the spacing by eye.
Stand several feet away from a sample arrangement first. The pattern can look completely different once repeated across ten feet of wall.
The budget trick: buy boards, not “fluted panels”
The biggest saving comes from treating the project as a trim job rather than buying a specialty wall system.
For example, Home Depot currently lists an 8-foot 1 × 4 primed MDF board at about $6.98, with an actual width of 3½ inches and thickness of 11/16 inch. Its 1 × 2 primed MDF option is listed around $5.98. Prices vary by store and location, but these figures illustrate why ordinary MDF can make more sense than specialty panels.
Lowe's likewise sells 1 × 4 × 8-foot primed MDF specifically for decorative applications, including accent walls.
Here's the clever part.
If your table saw can safely rip a 3½-inch-wide board into two approximately 1½-inch strips, one 1 × 4 can produce two flutes, with the remaining material accounting for the saw kerf and allowance. Measure your actual board before committing to the cutting plan.
That matters because “1 × 4” isn't actually 1 × 4.
A realistic 8 × 8-foot example
Imagine an 8-foot-wide wall using 1½-inch strips and ½-inch gaps.
The repeating pitch is 2 inches.
That means approximately 48 strips across the wall.
If you're buying 8-foot boards and making two strips from each board, you'd need roughly 24 boards before allowing for mistakes, edge pieces or waste.
At $6.98 per board, that's about $168 for the raw MDF using the current example price.
Add adhesive, caulk, primer, paint and consumables, and you're still working with a very different budget from a professionally installed feature wall.
Your local price may be higher or lower. Treat the calculation as a planning model, not a quote.
Measure the wall before touching the saw
This is where many DIY projects quietly go wrong.
Measure the wall's width in at least three places: near the floor, around eye level and near the ceiling. Older houses can have walls that aren't perfectly square, and even newer construction isn't guaranteed to behave like a CAD drawing.
Also measure the height at both sides.
Then mark:
Wall width
Wall height
Baseboard height
Ceiling trim or crown molding
Door and window openings
Electrical outlets
Switch plates
Any visible corners
If you're working around an outlet, don't simply cut the nearest strip until it “looks about right.” Remove the cover, measure the box position and plan the cut around it.
A few minutes here can save an ugly gap later.
Build a full-size test section
Before cutting dozens of pieces, make a small mock-up.
Take three or four strips and create the intended pattern on the floor.
Try two versions:
Option A: 1½-inch strip + ½-inch gap
Option B: 1½-inch strip + ¾-inch gap
Photograph both from across the room.
This sounds excessive. It isn't.
The spacing that looks elegant on a close-up Pinterest-style photograph can feel much too busy across an entire wall.
Prep the wall, but don't obsess over perfection
You don't need to skim-coat every tiny imperfection.
You do need a clean, reasonably sound surface.
Remove dust and grease. Scrape loose paint. Fill obvious holes. Sand glossy areas that could interfere with adhesion.
If the existing wall is dramatically uneven, stop and deal with that first. Fluted strips can disguise minor imperfections, but they don't magically straighten a badly bowed wall.
And paint the wall behind the flutes before installing the strips.
That's a small trick with a big payoff.
If the gaps are dark, shadows will naturally hide tiny inconsistencies. If they're painted white while your flutes are dark, every little variation becomes visible.
Cut everything consistently
Set up a stop block if you're using a miter saw.
That way, every strip comes out the same length rather than relying on repeated tape-measure marks.
The first few pieces are your test pieces. Don't immediately cut the entire batch.
Check:
Length
Width
Edge quality
Squareness
Fit against the wall
MDF edges can be surprisingly unforgiving. A dull blade can leave a fuzzy edge that later requires sanding, and sanding fifty identical pieces by hand gets old very quickly.
Cut once. Inspect. Then batch-cut.
The first strip determines almost everything
This is probably the most important installation detail.
Don't start by rapidly gluing strips across the wall.
Start with the first one.
Use a long level or laser level to establish a perfectly vertical reference line. If the first strip is slightly crooked, every subsequent strip can inherit that error.
You might think a few millimeters won't matter.
After 40 strips, it will.
A useful approach is to establish your starting edge, position the first strip, check it vertically in two directions, then secure it before moving onward.
Adhesive is useful—but understand its limits
A paneling adhesive can make installation much easier, particularly on a sound, reasonably flat wall.
Loctite Power Grab Express Molding & Paneling, for example, is specifically marketed for molding and paneling. The manufacturer states that it has high initial tack, allows repositioning for up to 15 minutes and fully cures in about 12 hours. Its technical documentation recommends applying adhesive around the perimeter and additional beads at intervals; finishing nails may still be needed on larger pieces to prevent movement or warping.
That's worth understanding.
“Instant grab” doesn't mean “fully cured.”
If a strip feels firmly attached five minutes later, that doesn't mean you've reached the adhesive's final strength.
For a different adhesive formulation, Loctite Power Grab Ultimate is listed as setting in about 10 minutes and curing in 24 hours. Always follow the product actually in your hand rather than assuming all construction adhesives behave the same way.
Use a physical spacer instead of measuring every gap
This is one of those wonderfully boring tricks that makes the project faster.
Cut a small block exactly equal to your desired gap.
If the gap is ½ inch, make a ½-inch spacer.
Put the spacer against the previous strip, push the next strip against it, check the new piece with your level, then secure it.
Repeat.
Now you're not measuring 48 separate gaps. You're reproducing the same dimension over and over.
That consistency is what makes inexpensive MDF look intentional.
Don't forget the corners
Corners are where the DIY illusion can fall apart.
If the fluted wall ends at an open edge, don't simply stop the strips and leave exposed MDF ends.
Use a clean vertical finishing board, trim piece or return detail.
At an outside corner, decide whether the flutes will wrap around it or terminate against a wider edge board. Either can work. What looks cheap is an unfinished cut edge staring into the room.
The same applies at the ceiling.
A tiny, consistent reveal can look intentional. A random collection of different-sized gaps looks like a mistake.
Caulk is the secret weapon
Once the strips are installed, step back.
You'll probably notice tiny gaps.
That's normal.
Use paintable caulk where appropriate to clean up visible joints and transitions. Fill nail holes with suitable filler, allow it to dry and sand gently.
Don't bury the grooves in filler.
The goal is to make the perimeter and connections disappear while keeping the individual flutes crisp.
A sloppy finishing stage can ruin excellent carpentry surprisingly quickly.
Paint the wall and flutes as one surface
This is where the luxury effect really arrives.
Prime raw MDF edges as needed and use a quality interior paint compatible with the substrate. If you're painting the entire feature wall one color, spraying can produce a particularly uniform finish, although a careful brush-and-roller approach works too.
A gallon of interior paint typically covers around 350–400 square feet, although actual coverage depends on the surface, application method and desired finish.
Benjamin Moore's Aura Interior line, for example, lists 350–400 square feet per gallon and approximately one-hour dry and recoat times for its interior products, while recommending one or two coats depending on the product and surface.
For a fluted wall, matte is usually forgiving and sophisticated. Eggshell or satin is easier to wipe clean, but higher sheen can emphasize every little surface defect.
Color ideas that work especially well
Warm white: soft, architectural and easy to coordinate.
Greige: excellent if the room already contains natural wood.
Charcoal: dramatic, especially with warm lighting.
Deep green: rich without automatically feeling formal.
Moody navy: works beautifully behind a bed or media console.
For a genuinely expensive appearance, don't automatically choose the darkest possible color. The relationship between the wall, flooring, furniture and lighting matters more than chasing a “luxury” paint shade.
A simple budget comparison
Approach | Main advantage | Main drawback |
|---|---|---|
Ready-made fluted panels | Fast installation | Higher material cost |
Individual MDF strips | Maximum flexibility | More cutting |
Solid wood strips | Natural grain | Usually costs more |
Ripped MDF boards | Strong budget potential | Requires accurate cutting |
Pre-finished MDF can also save painting time. Home Depot's Finished Elegance line, for example, currently lists an 8-foot 1 × 4 molding board at $13.26 and describes it as a cut-install-caulk product with a factory finish.
That's not necessarily the cheapest route, but it illustrates another useful trade-off: sometimes paying more for the finish saves more time than it costs.
Five mistakes I'd avoid
1. Starting at a crooked wall edge
A corner isn't necessarily square. Establish your reference line instead.
2. Making the last strip tiny
Do the layout math before installation. If your final strip ends up being an awkward sliver, redistribute the pattern slightly across the wall.
3. Ignoring outlets
Plan electrical openings before the strips are glued permanently.
4. Painting only the front faces
The grooves matter. Use an appropriate method to get paint into the visible recesses without creating thick ridges.
5. Rushing the adhesive cure
It may feel solid long before it has reached its intended cure. Follow the manufacturer's instructions.
Is MDF suitable for every room?
Not quite.
MDF is excellent for many dry interior spaces, but excessive moisture is a poor environment for ordinary MDF. A bedroom, living room or hallway is a much more straightforward application than a constantly damp bathroom.
For humid locations, investigate moisture-resistant materials or purpose-built wall panels instead of assuming standard MDF is suitable.
And if the wall is near a radiator, stove or another heat source, check the material and adhesive manufacturer's requirements before installation.
FAQ
How much does a DIY fluted accent wall cost?
It depends heavily on wall size, material and local prices. Using inexpensive primed MDF can keep the material cost relatively low, while paint, adhesive, trim and tools add to the final number. For planning, calculate the wall area first, then calculate your strip count from the chosen width and gap.
What is the best spacing for fluted wall panels?
A ½-inch to ¾-inch gap with roughly 1½-inch-wide strips is a useful starting point. Tighter spacing creates a more detailed appearance; wider spacing creates stronger vertical lines.
Can I install MDF fluted strips without nails?
Sometimes. A suitable construction adhesive can provide strong initial grab, but the manufacturer's instructions and the condition of the wall determine whether additional mechanical fastening is appropriate. Don't assume adhesive alone is always enough.
Should I paint the wall before installing the flutes?
Yes. Painting the background first makes the gaps look cleaner and eliminates the awkward task of trying to roll paint into narrow spaces afterward.
Does a fluted wall make a room look bigger?
It can make the ceiling feel visually taller because the repeated vertical lines draw the eye upward. The effect is strongest when the pattern is consistent and isn't interrupted by excessive furniture or competing wall treatments.
The detail that makes the difference
The cheapest version of this project is simply a collection of strips glued to drywall.
The best version is different.
The strips are evenly sized. The gaps repeat perfectly. The first piece is dead straight. The edges disappear into clean trim, the caulk lines are subtle, and the paint has the same finish across every surface.
That's the part worth spending your time on.
Before buying all the MDF, build one small sample section and look at it under your room's actual lighting. If the proportions feel right there, the full wall becomes a much more predictable weekend project—and that's when an inexpensive pile of trim starts looking like custom millwork.
DIY fluted accent wall
fluted wall ideas
budget room makeover
luxury accent wall
room decor DIY
Found this helpful? Share it!